Maestro Intro
TestingBot provides a grid of remote iOS simulators and Android devices + emulators, ready to run your Maestro flows.
Maestro is a mobile UI testing framework, which supports testing on both iOS and Android. You write flows, which are story-like tests, where you describe a specific flow in your mobile application. For example, you could have a login flow, or a checkout flow.
Maestro is a relatively new test framework and offers several nice features, such as:
- Built-in tolerance to flakiness: various mechanisms are added to try and prevent flaky tests, for example locators that have changed or moved positions.
- Automatic waits: Maestro will automatically wait for certain conditions, which means you do not have to worry about delays, or adding sleep commands to your tests.
- Declarative syntax, which is defined in Flow (
yaml) files.
Why TestingBot Cloud?
TestingBot has been offering cloud-based testing since 2012 and has built a robust solution for Maestro cloud testing. Compared to other vendors and Maestro cloud, we offer the following improved features:
- Run on any iOS version, even beta versions (26.0)
- Test on physical Android devices, not just emulators (though that's also certainly possible)
- No execution limit: your tests can run as long as they need
- Apply various options such as setting orientation, geolocation options and more
Setup
Installing Maestro locally on your computer is not a requirement, but it might help to first run Flows on your local computer before running in the cloud, to make sure the flow test files are valid.
To install Maestro CLI, please install it like this:
curl -Ls "https://get.maestro.mobile.dev" | bashTo run mobile app tests with Maestro on TestingBot, you will first need to upload your iOS or Android app to TestingBot. Once that is done, you will need to zip the Flow files together and upload these through the TestingBot API.
Finally, you can run a REST API call to start the Maestro tests on one or more iOS simulators or Android devices.
Upload Mobile App
You will need to upload a mobile app to run tests with Maestro. The format of this file depends on which device type you'd like to test:
-
iOS Simulators:
You can upload your
.zipfile, see here how to prepare this zip file.Maestro does not yet provide support for physical iOS devices.
-
Android emulators/physical devices:
Upload the
.apkfile, which TestingBot will automatically install on the Android device.
curl -u api_key:api_secret \
-X POST "https://api.testingbot.com/v1/app-automate/maestro/app" \
-F "file=@/path/to/app/file/sample-debug.zip"
The API response will include an id response, which you can use in the other API calls.
{
    "id": 4012
}
Upload Maestro Flows
Maestro Flow files are .yaml files which contain the actions that need to be performed. You can zip these together and upload to TestingBot by using the following command:
zip -r flows.zip *.yamlTo upload the Flows zip file, please follow the example below.
curl -u api_key:api_secret \
-X POST "https://api.testingbot.com/v1/app-automate/maestro/:id/tests" \
-F "file=@/path/to/app/file/flows.zip"
Replace the :id with the identifier you received during the app upload call. (In this example 4012)
Calling this multiple times with the same :id will overwrite the previously uploaded Flows zip file.
Zip structure
Maestro needs to know which flows it should run. If there are flow files (.yaml files) in the top-level directory of the zip file, it will run these flow files.
You can also include a config.yaml file in the top-level directory of the zip file, to indicate which flows should be tested.
For example, you can use the ** annotation to indicate you want to run all flows, even if they are in separate sub-directories.
flows:
  - "**"
More information is available in the Maestro Docs.
Run Maestro tests
Once you've uploaded both your app and Flows zip file, you can run the Maestro tests on the TestingBot cloud.
Specify one or more capabilities, to indicate on which iOS simulators or Android devices you want to run your tests on.
Replace the :id with the identifier you received during the app upload call. (In this example 4012)
View Maestro Results
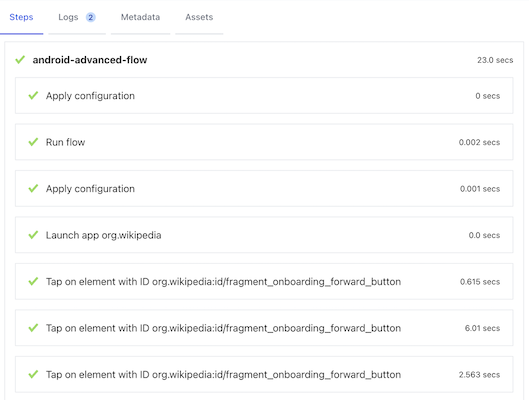
The results of your Maestro tests will be available in the TestingBot dashboard.
Each test result contains a video, test logs and other meta data generated during the test run. Maestro flows will be displayed, together with the steps that were taken during each flow.
You can also use an API call to get back the result from the run(s):
curl -u api_key:api_secret \
"https://api.testingbot.com/v1/app-automate/maestro/:project_id"
Replace the :project_id with the identifier you received during the app upload call. (In this example 4012)
The response will contain a success boolean, indicating whether the test passed or failed.
{"runs":[{"id":14019,"status":"DONE","capabilities":{"version":"15.0","deviceName":"Pixel 9","platformName":"Android"},"success":0,"report":"...","created_at":"2025-08-26T10:30:42.000Z","test":{"sessionId":"0255832ee646-e7620dc7d449-172937ccfc2d-175620408997-95145830","environment":{"name":"chrome","os":"Pixel 9 - 15.0","version":"15.0"}}}],"success":false,"version":"1.0","completed":true}You can poll this request to check if the tests have finished running. The completed boolean will be set to true when all tests have finished.
JUnit Report
All Maestro tests on TestingBot will by default run with a JUnit reporter. This report is accessible programmatically:
curl -u api_key:api_secret \
"https://api.testingbot.com/v1/app-automate/maestro/:project_id/:run_id/"
Replace the :project_id with the identifier you received during the app upload call. (In this example 4012)
Replace the :run_id with the identifier for this run.
The response will contain a report string value that contains the XML formatted JUnit report.
For each flow, there will be a testcase entry, together with multiple property child items, for each step in a Maestro flow.
Webhooks
Because the Maestro tests run asynchronously, you might want to get notified when a test run has finished. You can poll the results API or use the Webhook integration or Slack integration to get notified when a test run has finished.
Example Maestro Flow
Below is a simple example Flow, where we input two values in the TestingBot example app:
appId: org.reactjs.native.example.SampleApp
---

- launchApp

- tapOn:
    id: inputA

- longPressOn:
    id: inputA

- tapOn:
    text: "Select All"

- eraseText

- inputText: "10"

- tapOn:
    id: inputB

- longPressOn:
    id: inputB

- tapOn:
    text: "Select All"

- eraseText

- inputText: "5"

- tapOn:
    id: sum

- assertVisible:
    text: "15"
Maestro Parallel Testing
The TestingBot physical and virtual device grid is optimised to run many tests concurrently. You can run multiple Maestro tests simultaneously (in parallel), which will drastically shorten your total test duration.
Depending on your subscription plan, you will be able to run 1 or more Maestro tests at the same time. If you exceed the threshold, additional Maestro tests will be queued until a slot becomes available.
For example, let's assume you have an Automation Pro plan with 2 concurrent tests. And you want to run 10 Maestro tests, or run the same Maestro test on 10 different device configurations:
- 2 Maestro tests will run simultaneously
- The other 8 are waiting (queued) until one of the first two finishes
- When a slot frees up, the next Maestro test in the queue will start to run
- Finally, when all tests have run, you will see the results in the TestingBot dashboard
Currently there is no limit to the amount of Maestro tests you can add to the queue.
Integrations
TestingBot offers various integrations which allow for connecting your Maestro tests with external services. For example; you can receive automated Slack messages each time a Maestro test runs or fails, or you can integrate Maestro testing with any CI/CD system.