TestingBot Jenkins Plugin
This guide will help you integrate the TestingBot Jenkins Plugin in your Jenkins jobs and pipelines. The plugin integrates the TestingBot browser and device cloud directly into Jenkins:
- Stores your TestingBot key and secret through the Jenkins Credentials plugin, with a Test Connection button to verify them.
- Starts a TestingBot Tunnel around your build, so your tests can reach servers behind your firewall or on the build agent.
- Embeds the video, screenshots and logs of every test on the build page, so you never have to leave Jenkins to review a run.
- Reports each test's pass/fail result to TestingBot, and can publish the outcome as a GitHub check on the commit and pull request.
- Supports both freestyle jobs and Pipeline (Jenkinsfile), as well as Configuration as Code.
Prerequisites
- A TestingBot account with an API key and secret.
- Jenkins 2.541.3 or newer, running on Java 17 or newer.
- The JUnit plugin to embed per-test reports (usually already installed).
Install the Plugin
In Jenkins, go to Manage Jenkins > Plugins > Available plugins, search for TestingBot, select it and install. You can install without restarting Jenkins.
The plugin is also listed in the Jenkins plugins directory.
Add your Credentials
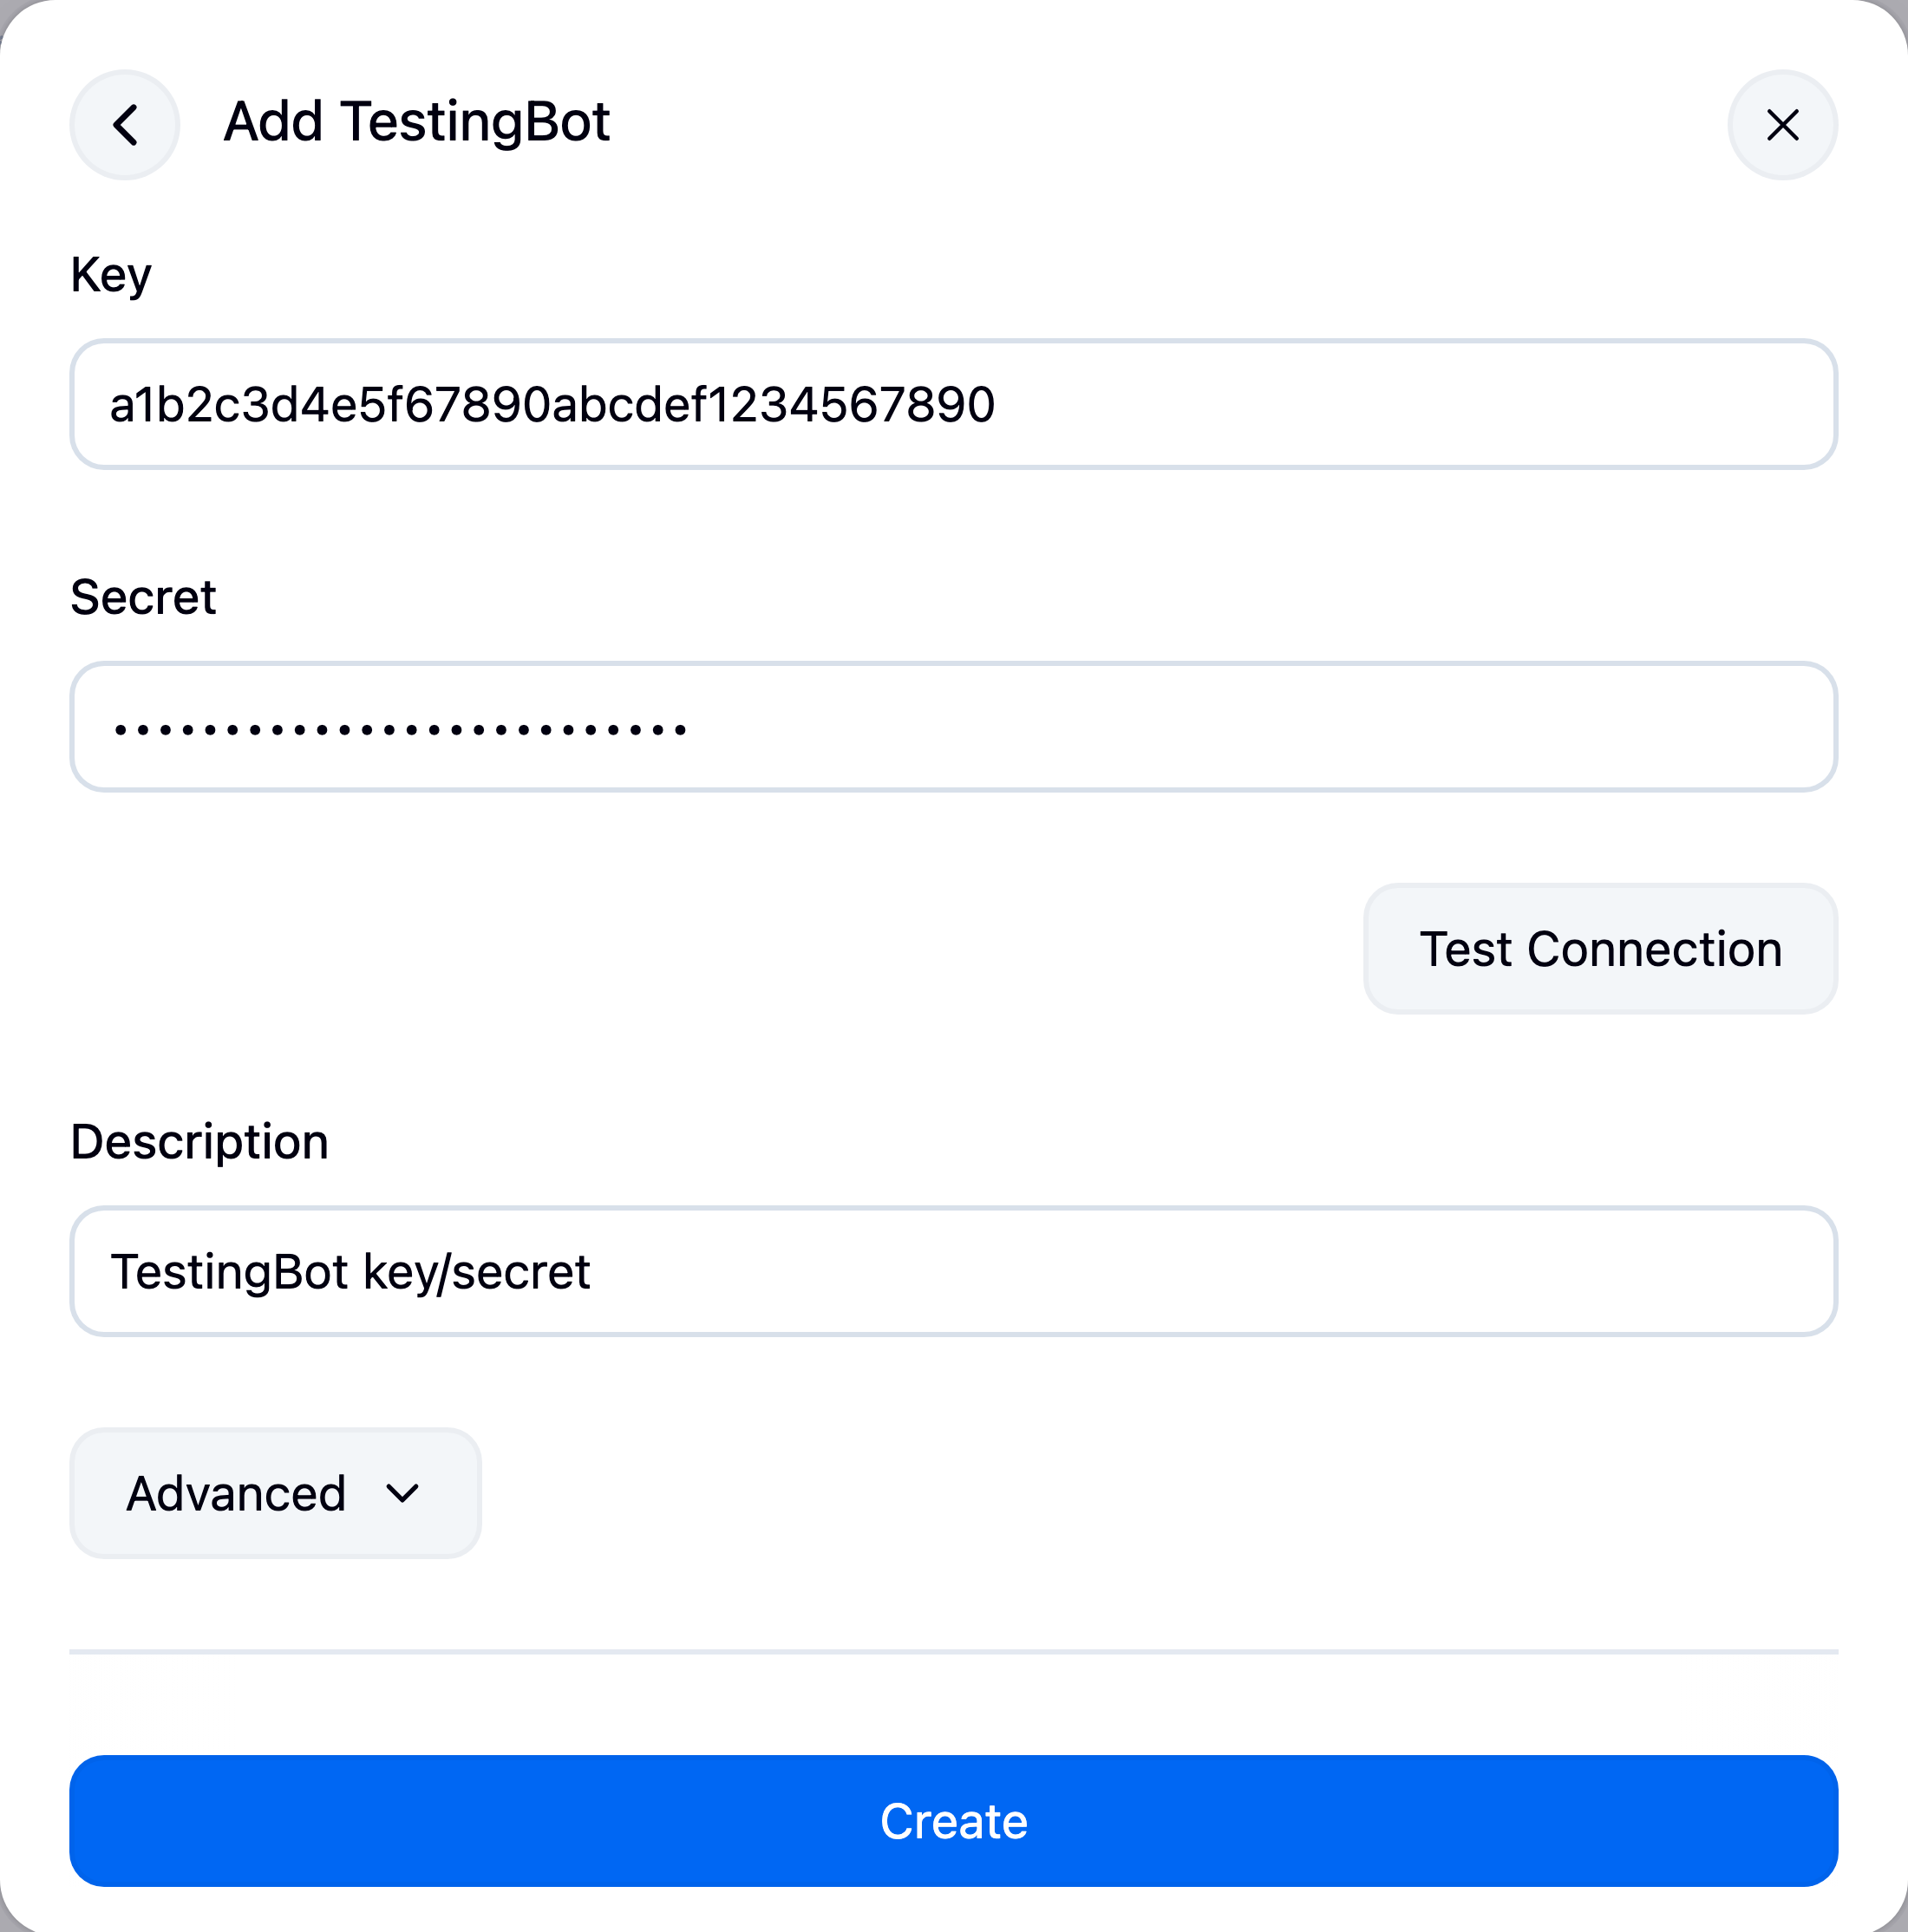
Go to Manage Jenkins > Credentials, add a credential of kind TestingBot, and enter your key and secret.
You can obtain both values from the TestingBot member area.
Click Test Connection to verify the key and secret against TestingBot before saving — it confirms which account they belong to, so you catch a typo before your first build runs.
Set up the Build Environment
In a freestyle job's configuration, open the Build Environment section and enable TestingBot. Pick the credentials you added above; the plugin then injects your key and secret into the build as environment variables (see Environment Variables).
Enable Use TestingBot Tunnel to start a TestingBot Tunnel before
the build and stop it afterwards, so tests running on the agent can reach internal, staging or
localhost environments through the TestingBot grid.

If your tests target a staging or internal environment that sits behind a firewall, either enable the Tunnel above (recommended), or allowlist TestingBot's grid IP ranges on that environment so our browsers can reach it. The current ranges are listed on the IP ranges page.
The Tunnel runs on the agent that executes the build, so if you pin TestingBot jobs to specific
agents (via a node label and Restrict where this project can be run), those agents need
Java 17 or newer on their PATH. Each
testingbotTunnel { } block starts an isolated tunnel with its own
TESTINGBOT_TUNNEL_IDENTIFIER, so parallel builds on the same agent don't interfere.
Example Test
Point your test at the TestingBot grid and read the key and secret from the environment variables the plugin
injects. Set the build capability to $TESTINGBOT_BUILD so
all sessions from one Jenkins build are grouped together (see the Build Report below).
import org.openqa.selenium.WebDriver;
import org.openqa.selenium.chrome.ChromeOptions;
import org.openqa.selenium.remote.RemoteWebDriver;

import java.net.URL;
import java.util.HashMap;
import java.util.Map;

public class JenkinsTest {

  public static void main(String[] args) throws Exception {
    ChromeOptions options = new ChromeOptions();
    options.setCapability("browserVersion", "latest");
    options.setCapability("platformName", "WIN11");

    Map<String, Object> tbOptions = new HashMap<>();
    tbOptions.put("key", System.getenv("TB_KEY"));
    tbOptions.put("secret", System.getenv("TB_SECRET"));
    tbOptions.put("name", "Jenkins Test");
    tbOptions.put("build", System.getenv("TESTINGBOT_BUILD"));
    tbOptions.put("tunnel-identifier", System.getenv("TESTINGBOT_TUNNEL_IDENTIFIER"));
    options.setCapability("tb:options", tbOptions);

    RemoteWebDriver driver = new RemoteWebDriver(
        new URL("https://hub.testingbot.com/wd/hub"), options);

    // Print the session id so the plugin can embed this test's report.
    System.out.println("TestingBotSessionID=" + driver.getSessionId().toString());

    driver.get("http://localhost:8080");
    System.out.println(driver.getTitle());
    driver.quit();
  }
}
import os
from selenium import webdriver
from selenium.webdriver.chrome.options import Options
options = Options()
options.set_capability('browserVersion', 'latest')
options.set_capability('platformName', 'WIN11')
options.set_capability('tb:options', {
'key': os.environ['TB_KEY'],
'secret': os.environ['TB_SECRET'],
'name': 'Jenkins Test',
'build': os.environ.get('TESTINGBOT_BUILD'),
'tunnel-identifier': os.environ.get('TESTINGBOT_TUNNEL_IDENTIFIER')
})
driver = webdriver.Remote(
command_executor='https://hub.testingbot.com/wd/hub',
options=options)
# Print the session id so the plugin can embed this test's report.
print("TestingBotSessionID=" + driver.session_id)
driver.get("http://localhost:8080")
print(driver.title)
driver.quit()#!/usr/bin/env ruby
require 'rubygems'
require 'selenium-webdriver'
options = Selenium::WebDriver::Chrome::Options.new
options.add_option('browserVersion', 'latest')
options.add_option('platformName', 'WIN11')
options.add_option('tb:options', {
'key' => ENV['TB_KEY'],
'secret' => ENV['TB_SECRET'],
'name' => 'Jenkins Test',
'build' => ENV['TESTINGBOT_BUILD'],
'tunnel-identifier' => ENV['TESTINGBOT_TUNNEL_IDENTIFIER']
})
driver = Selenium::WebDriver.for(
:remote,
url: "https://hub.testingbot.com/wd/hub",
options: options)
# Print the session id so the plugin can embed this test's report.
puts "TestingBotSessionID=" + driver.session_id
driver.navigate.to "http://localhost:8080"
puts driver.title
driver.quitconst webdriver = require('selenium-webdriver');
const chrome = require('selenium-webdriver/chrome');
async function runJenkinsTest () {
let options = new chrome.Options();
options.set('browserVersion', 'latest');
options.set('platformName', 'WIN11');
options.set('tb:options', {
'key': process.env.TB_KEY,
'secret': process.env.TB_SECRET,
'name': 'Jenkins Test',
'build': process.env.TESTINGBOT_BUILD,
'tunnel-identifier': process.env.TESTINGBOT_TUNNEL_IDENTIFIER
});
let driver = new webdriver.Builder()
.usingServer('https://hub.testingbot.com/wd/hub')
.withCapabilities(options)
.build();
// Print the session id so the plugin can embed this test's report.
const session = await driver.getSession();
console.log("TestingBotSessionID=" + session.getId());
await driver.get("http://localhost:8080");
console.log(await driver.getTitle());
await driver.quit();
}
runJenkinsTest();A complete, runnable project is available on our Jenkins-Demo repository.
Mobile / Native App Testing
To test a native mobile app (Appium) that your Jenkins job builds, upload the app to
TestingBot Storage and reference the returned
tb:// app URL as the Appium app capability.
Android .apk, iOS .ipa, and a
.zip of an iOS Simulator .app build are all supported.
In a freestyle job, add the Upload an app to TestingBot Storage build step
before your test step and point it at the built app. It uploads the file and exports the app URL as an
environment variable (default TESTINGBOT_APP_URL) for the following steps to use.
In a pipeline, the testingbotUpload step returns the app URL:
testingbot('251ca561abdfewf285') {
    def appUrl = testingbotUpload(file: 'build/app.apk')
    // pass appUrl as the Appium "app" capability in your tests
    sh "APP_URL=${appUrl} ./run-appium-tests.sh"
}
The upload runs on the agent that holds the artifact, so only the credentials cross the (encrypted) remoting
link — the app bytes are sent straight from the agent to TestingBot. From there, embedding reports,
grouping sessions under $TESTINGBOT_BUILD and publishing
GitHub checks work exactly as they do for browser tests.
Embed TestingBot Reports
To see the video, screenshots and logs of each test on the build page, the plugin reads the
TestingBotSessionID=<sessionId> lines your tests print (as shown in the example
above) and matches them against your JUnit results.
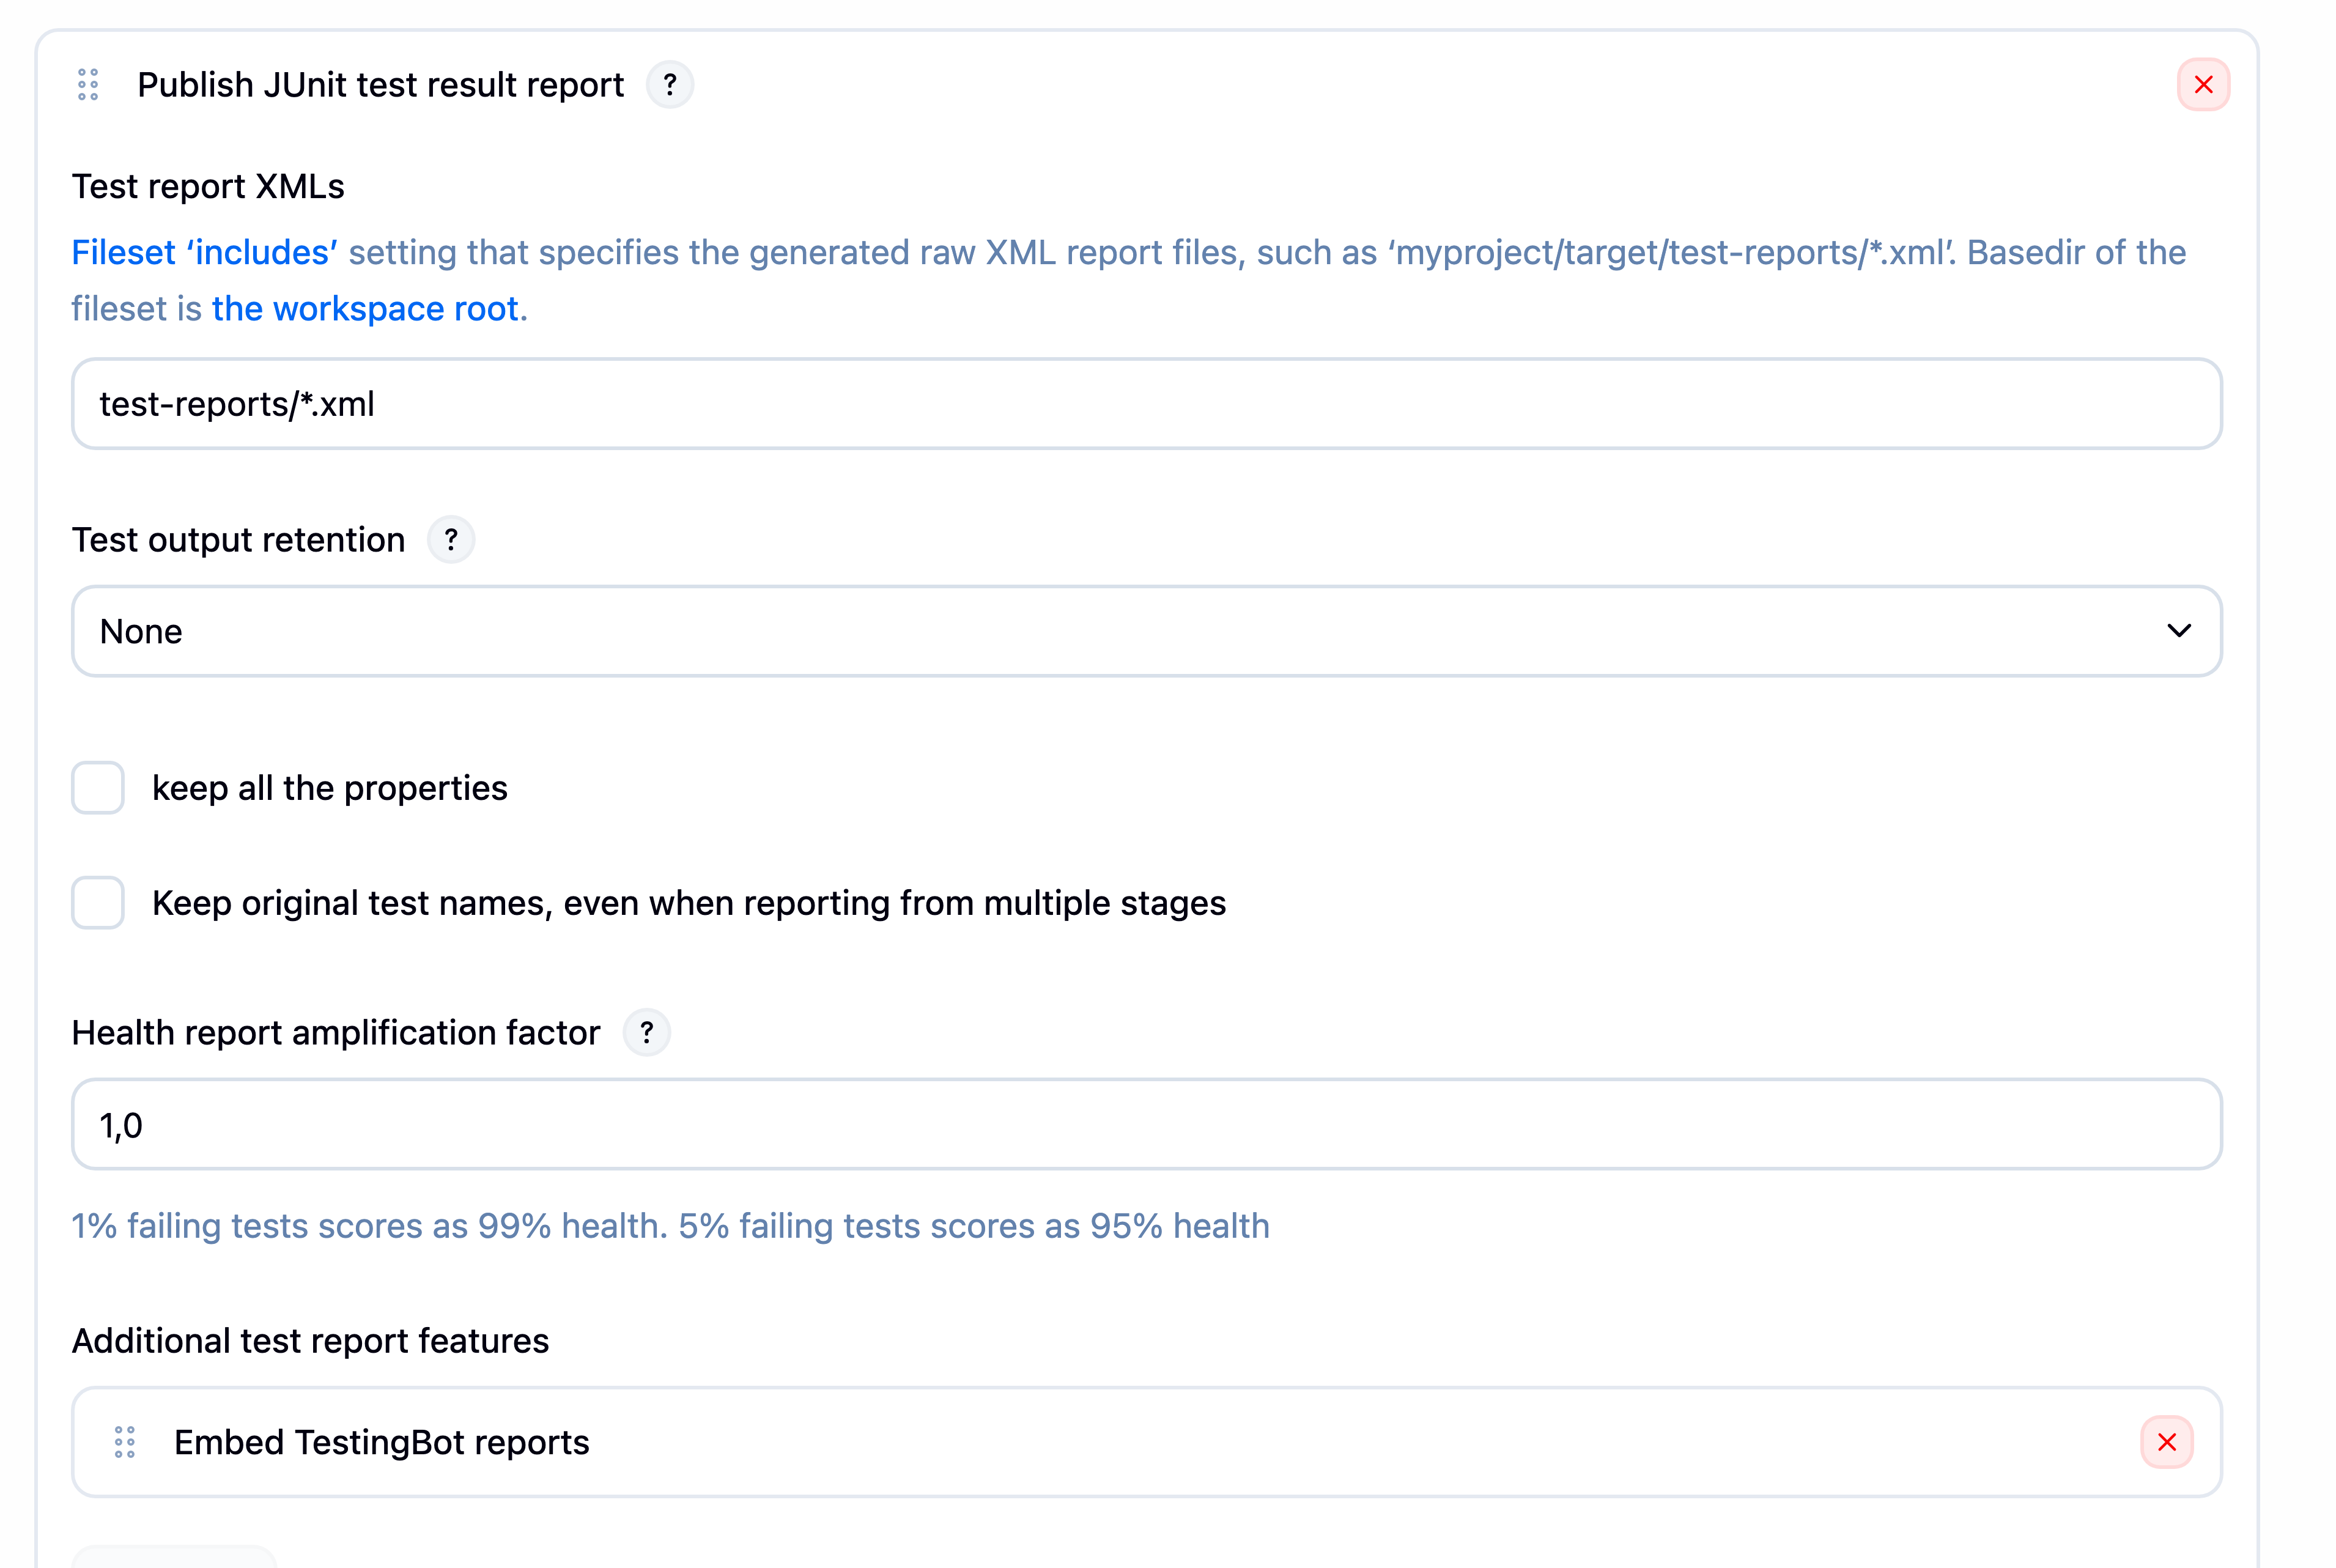
Add the Publish JUnit test result report post-build action and point it at your report files
(for example test-reports/*.xml). Then, under
Additional test report features, add Embed TestingBot reports.
Besides embedding the media, this also marks each session as passed or failed
on TestingBot, based on the outcome of the matching JUnit test — so the status you see in Jenkins matches
the status on TestingBot. In a pipeline, the testingbotPublisher() step does the same.
The plugin parses both stdout and stderr for the
TestingBotSessionID= token. When using JUnit reporting, the token needs to appear in a
<system-out> tag of the JUnit XML. On the build page, each JUnit test that used
TestingBot shows a preview thumbnail of its session that expands in place to the full video, screenshots and
logs — the media loads lazily, so collapsed sessions stay lightweight.
Embedded Build Report
Whenever the plugin injects credentials — through the freestyle Build Environment option or the
testingbot { } / testingbotTunnel { } pipeline steps —
it exposes a TESTINGBOT_BUILD environment variable and adds a
TestingBot Build page to the build.
Set your test's build capability to $TESTINGBOT_BUILD so
that all sessions from a single Jenkins build are grouped under one TestingBot build. The
TestingBot Build link on the build page then embeds that build's report — every session,
with status and video — directly inside Jenkins.
Publish Results as a GitHub Check
The plugin can publish the TestingBot outcome of a build as a GitHub check (✅/❌ on the commit and pull request) through the Checks API plugin.
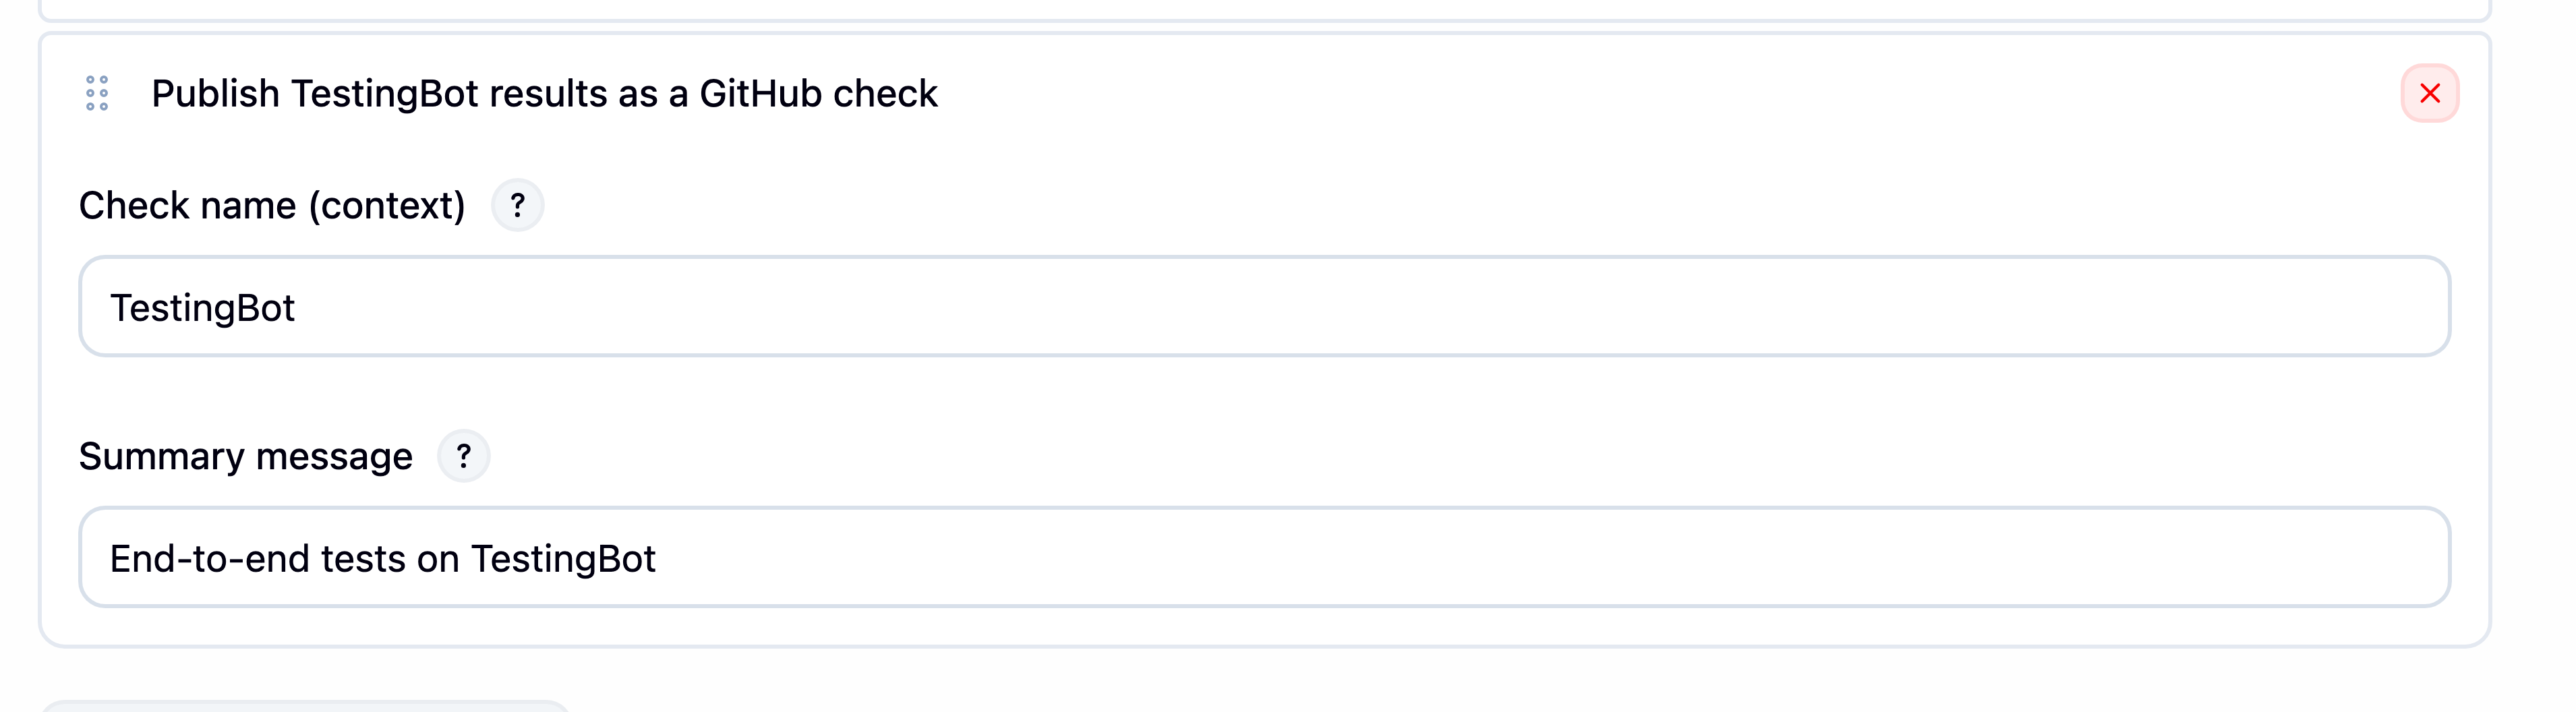
Add the Publish TestingBot results as a GitHub check post-build action in a freestyle job, or
call the testingbotChecks step in a pipeline:
testingbotChecks(name: 'TestingBot', message: 'End-to-end tests on TestingBot')-
name— the check name (its context on the commit/PR). Defaults toTestingBot. -
message— an optional summary; when omitted, a summary is generated from the TestingBot sessions in the build. The check links to the embedded TestingBot build report.
The check conclusion reflects the TestingBot sessions found in the build (all passed → success), falling back to the overall build result when no sessions are present. Delivery to GitHub is handled by the GitHub Checks plugin together with a GitHub App; if that is not installed, the step is a safe no-op.
Pipeline
The plugin provides Pipeline (Jenkinsfile) support through these steps:
-
testingbot(String credentialId)— injects your TestingBot key and secret as environment variables for the wrapped block. -
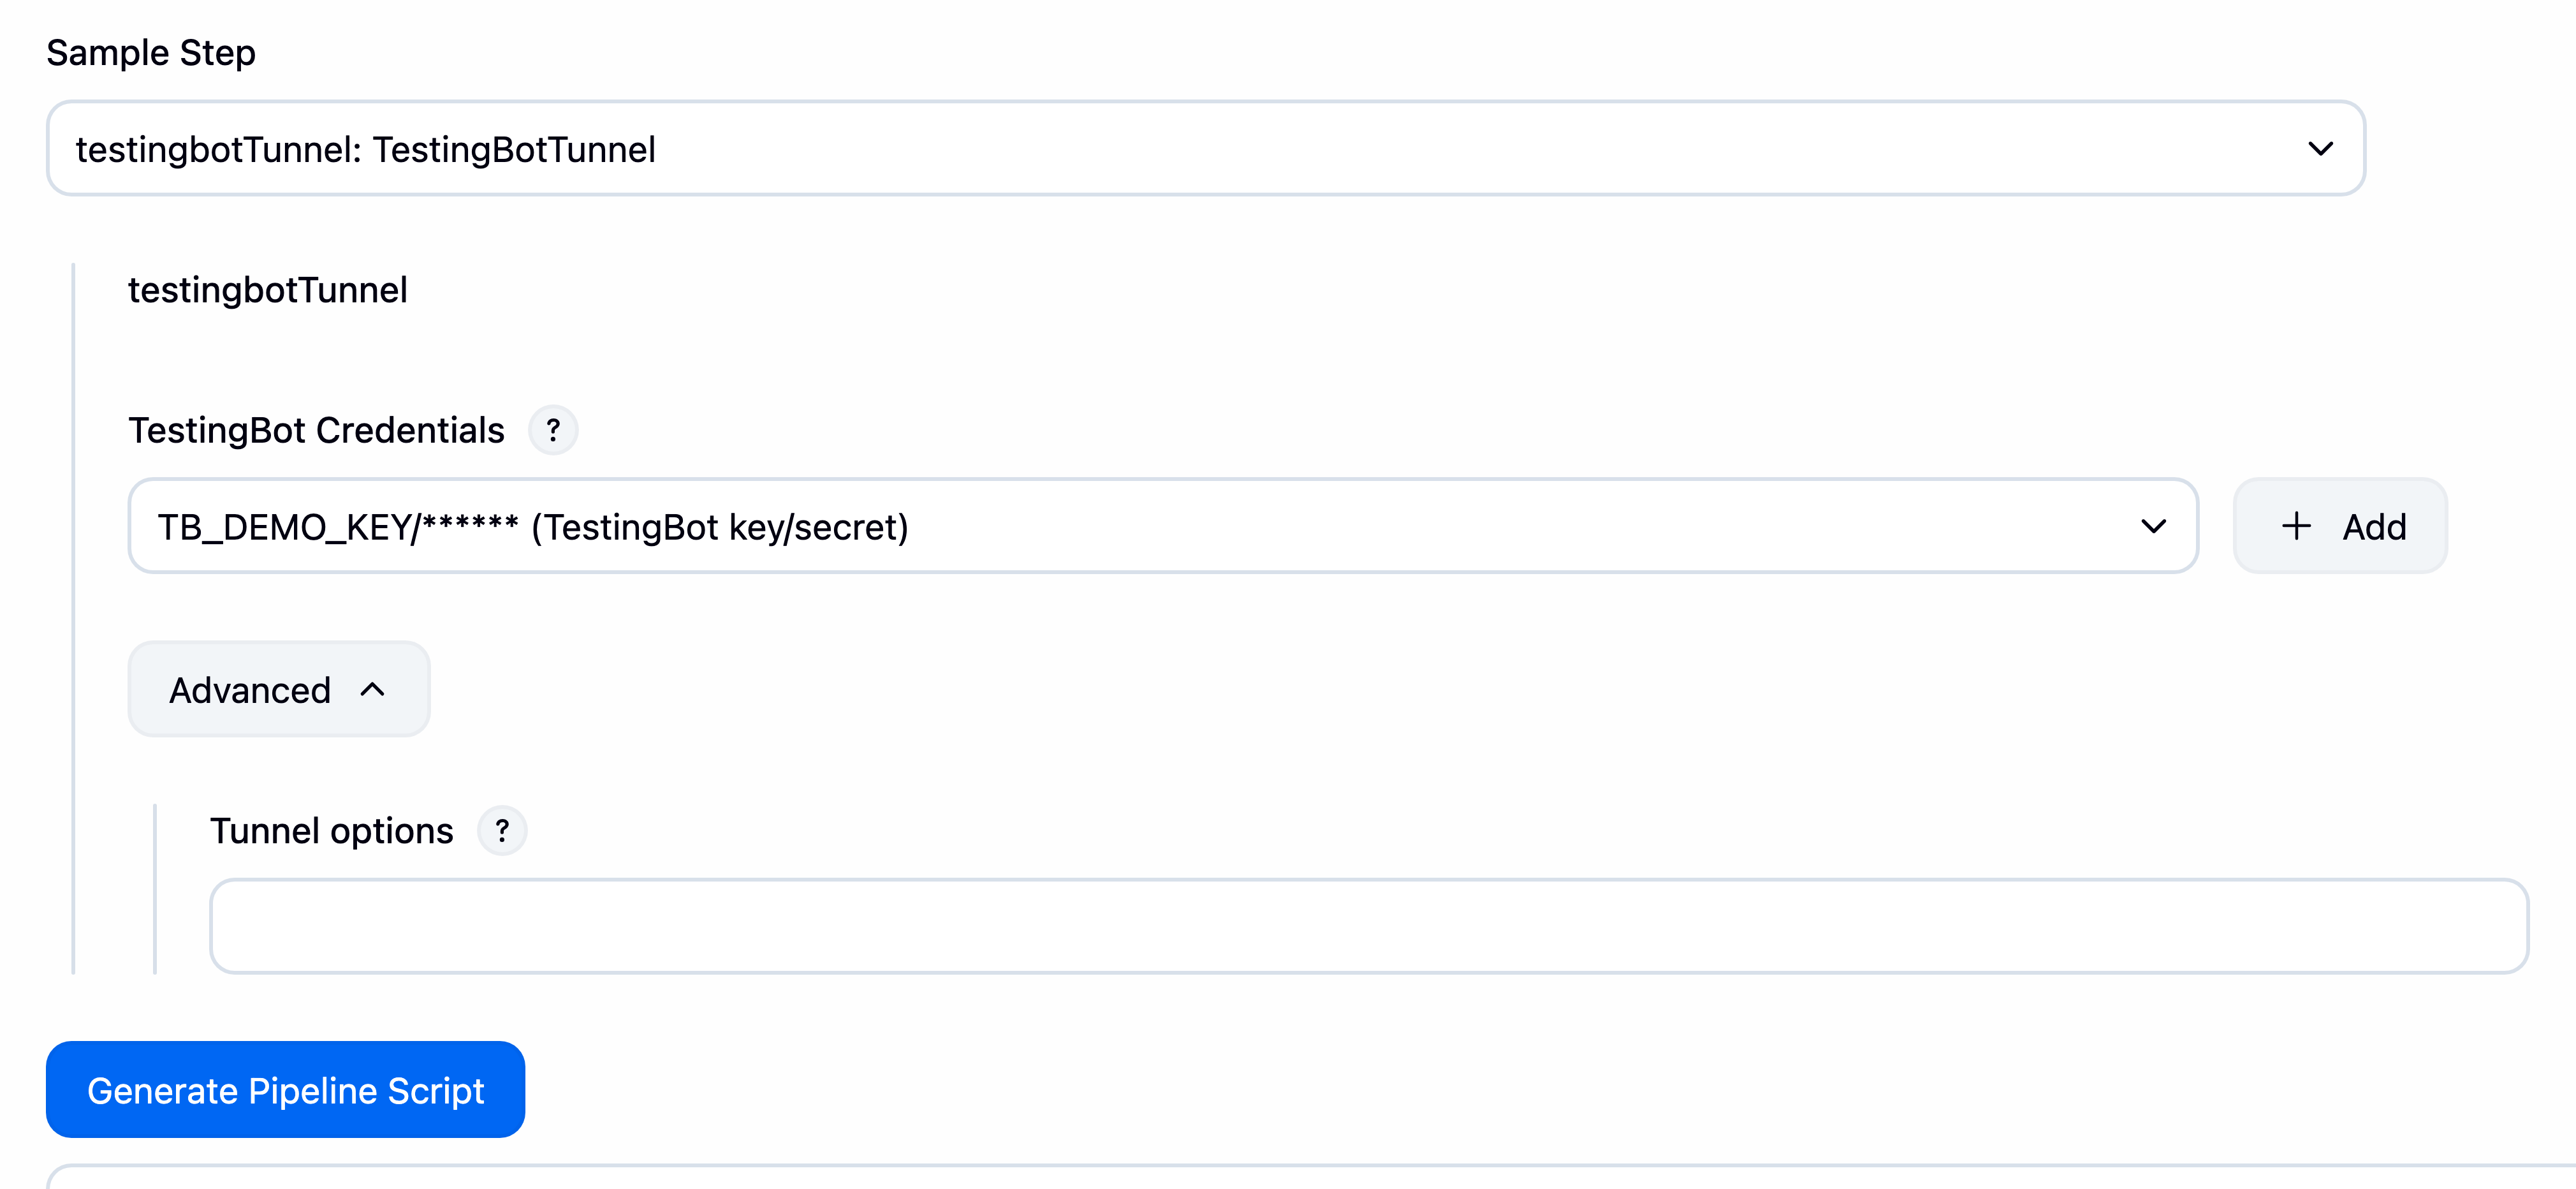
testingbotTunnel(credentialsId: '', options: '-d -a')— starts a TestingBot Tunnel around the wrapped block and stops it afterwards.optionsare passed verbatim to the tunnel. -
testingbotUpload(file: 'build/app.apk')— uploads a native app to TestingBot Storage and returns itstb://app URL. -
testingbotPublisher()— reads the JUnit report files and embeds the TestingBot test results. -
testingbotChecks(name: '', message: '')— publishes the outcome as a GitHub check.
The credentialId is the Id shown on the Jenkins Credentials page for the TestingBot
key and secret you added earlier. You can build any of these steps interactively with the Jenkins
Pipeline Syntax (Snippet Generator).
Declarative Pipeline
pipeline {
   agent any

   tools {
      // Install the Maven version configured as "M3" and add it to the path.
      maven "M3"
      ant "ant"
   }

   stages {
      stage('Build') {
         steps {
            // Get some code from a GitHub repository
            git 'https://github.com/testingbot/Jenkins-Demo.git'

            testingbot('251ca561abdfewf285') {
               testingbotTunnel(credentialsId: '251ca561abdfewf285', options: '-d') {
                    sh "ant test"
               }
            }
         }

         post {
            success {
               junit 'test-reports/*.xml'
            }
            always {
                testingbotPublisher()
            }
         }
      }
   }
}
Scripted Pipeline
node {
    git 'https://github.com/testingbot/Jenkins-Demo.git'

    // Inject credentials and start an isolated tunnel around the tests
    testingbot('251ca561abdfewf285') {
        testingbotTunnel(credentialsId: '251ca561abdfewf285', options: "--tunnel-identifier ci-${env.BUILD_NUMBER}") {
            sh 'ant test'
        }
    }

    junit 'test-reports/*.xml'
    // Embed TestingBot screenshots/video into the test report
    testingbotPublisher()
}
Each testingbotTunnel { } block starts an isolated tunnel with its own identifier, so
parallel pipeline branches never interfere with one another.
Environment Variables
Inside both testingbot { } and
testingbotTunnel { } blocks (and in a freestyle job with the TestingBot Build
Environment enabled):
| Variable | Description |
|---|---|
TESTINGBOT_KEY / TB_KEY
|
Your TestingBot API key. |
TESTINGBOT_SECRET / TB_SECRET
|
Your TestingBot API secret (masked in the build log). |
TESTINGBOT_BUILD
|
A per-build identifier. Pass it as your test's build capability so all sessions
from this Jenkins build are grouped together and shown on the embedded
TestingBot Build page.
|
Inside a testingbotTunnel { } block only (these describe the tunnel started for that block):
| Variable | Description |
|---|---|
HUB_HOST / HUB_PORT
|
Host and port to point your Selenium or Appium client at when using the tunnel. |
SELENIUM_HOST / SELENIUM_PORT
|
Selenium-specific aliases of HUB_HOST/HUB_PORT, kept for backwards compatibility. |
TESTINGBOT_TUNNEL_IDENTIFIER
|
The identifier of the tunnel started for this block. Pass it in your desired capabilities so parallel builds each use their own tunnel. |
Configuration as Code (JCasC)
The TestingBot credentials can be configured with the
Configuration as Code
plugin using the testingbot symbol:
credentials:
  system:
    domainCredentials:
      - credentials:
          - testingbot:
              id: "testingbot"
              description: "TestingBot key/secret"
              key: "${TESTINGBOT_KEY}"
              secret: "${TESTINGBOT_SECRET}"
Reference the id (here testingbot) as the
credentialsId in your job or pipeline.
More Information
The plugin is open source and listed in the Jenkins plugins directory. More information, including framework examples and the full changelog, is available in the TestingBot Jenkins Plugin repository.